Efficient Time Tracking with Sanoplan
Further Training:
You will learn here
- Log in and out
- Change user
- For advanced users (warnings, holidays, overtime, user login with password, mobile use, RFID, QR code)
Logging in and out – Time recording
This training will show you how to use time tracking. Many companies have separate time tracking devices connected to the human resources department. Working hours can also be recorded directly in sanoplan, eliminating the need for a separate system (of course, you can also work without integrated time tracking, but then you’ll have to record sick notes, etc., separately).
Step-by-step instructions
- Open time tracking:
Click the clock icon in the top center . The time tracking view opens. The employee’s name is displayed in the top left corner. Select the employee by clicking in the employee list on the right. - Record working time:
Click the light green Start button at the top to begin, and click End to stop. The time worked is displayed on the right. - To enter or correct the time manually:
Click in the time field; a cursor appears. Enter the time in 24-hour format , for example, 14:30. Do not use AM/PM. - Insert a work break:
After a break, the employee clicks Start again . A new time is recorded. The total hours are automatically calculated. - Select employee:
You’ll see the selected employee in the top left corner. To select a different employee, click on a name in the employee list on the right. - Special situations
When you double-click in the time column, a green menu appears:- Count all scheduled hours, even if not completed (for special services)
- Reset overtime (set a new starting value)
- Enter additional time (e.g. enter forgotten afternoon shift)
- User rights:
With supervisor rights , you can edit all times; with regular employee rights, you can only edit your own times from the last few days. Rights can be changed in the settings .
For advanced learners
Beginners can skip this for now unless you are looking for information on
- Warnings
- Overtime calculation
- Holidays
- Mobile use
- RFID
- QR-Code
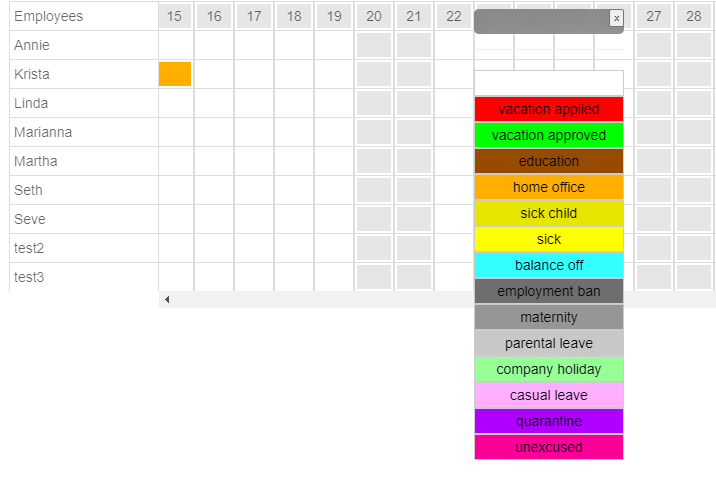
Warnings: If a user forgets to enter a start or end time for the day, the missing data will be highlighted in orange the next day for easy identification.
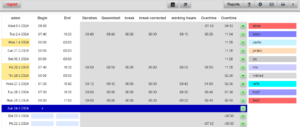
Overtime: Directly next to the recorded times, the program calculates the overtime in all details.
- First, the duration of the time block
- Then the total time of the day
- Then the recorded pause
- The break time is then corrected (if someone has not recorded a break, the legally prescribed times apply, e.g. 30 minutes after 6 hours of work, special night shift counting, etc.).
- Then the resulting working time (total time of the day minus the corrected break)
- Then the overtime of the day (calculated from working time minus the required daily time)
- And the last column counts the total overtime (overtime until yesterday plus overtime from today)
Public holidays are marked orange in the left date column. Half-marked days, such as December 24th or the last days of the year, are counted as half holidays in some countries.
If you need to set additional holidays for your company or country, there are two options:
- You can set this either by double-clicking in the left date column (a small window will open in which you can enter the name of the holiday and whether this day of absence should repeat annually).
- Or you can do it via the settings: Open the settings using the gear icon. There you’ll see the employee list. Click on “Holidays” on the left and you’ll see a page with all known holidays for the next 12 months. If this holiday doesn’t exist in your country, click the red minus sign to delete it.
- You can also set a custom holiday for your region or company by entering it in the top row and don’t forget to click “Annual” if you want to keep it for the next year.
- There is another way to get all the holidays for your region. You can use a standard ICS holiday calendar for your country. You can find several of them online by searching for “Download ical ‘Your Country'”. Download the correct calendar and save it to your hard drive (the German holiday calendar is already loaded by default). Then click the “Select Download” button to tell the system where you saved the calendar. Then click “Import” to import it into sanoplan. Delete unnecessary data using the red minus button as described above. Please check the holiday settings at least once a year, especially if you have entered your own days off.
Settings for mobile use, RFID time recording and QR recording
An employee can track their own working hours if they are granted permission to do so. There are four ways to do this, all of which are configured on the employee page under “Settings.”
- Time tracking in Sanoplan Desktop: The user requires a password, which they can enter in the same field where their supervisor enters their supervisor password. The supervisor can set the user password in the right-hand password column of the employee table. The password can be freely chosen. After logging in with this password, the regular user can no longer make any changes, but they can use the start and end buttons in time tracking and edit their times from the last few days.
- Time recording can also be started and stopped on a private mobile phone using the same password.
To use this mode, the user must open the page https://www.sanoplan.com/sanoplan/mobile.html.
He then has to get his access code (which he receives from his supervisor).
He must then enter his personal password and click on “Login” to display his personal mobile page.
The user should either save this personal page as a bookmark in the browser or, ideally, “save it to the home screen” (accessible via the browser menu). The advantage of “save it to the home screen” is that the user saves an app and no longer has to enter the access code and password. They can then open their time tracking by clicking on the app icon.
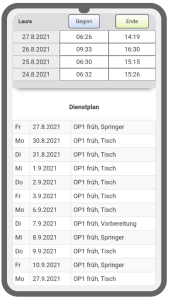
On their personal app, the user sees their roster table at the bottom and their time recording at the top. They can use the “Start” and “End” buttons as usual and also edit their last four working hours, provided their supervisor allows this (this is recorded in the settings).
Time recording with RFID:
If you prefer to work with RFID chips, that’s also possible. The most cost-effective way is with a simple RFID reader connected to an Android tablet (DO NOT use “Android Go”) and powered by a USB hub (the hub must be able to simultaneously supply power and process the USB signal).
- Once you’ve assembled the equipment, log in again as a supervisor and then click the RFID button in the top left corner of the employee settings page. This button will take you to the RFID login page. You should open this link on your tablet (mobile and desktop will also work) with the USB reader connected.
- If you now hold an invalid RFID chip in front of the reader, an error message will appear informing you of the number of the unknown RFID chip. Enter this number in the employee settings table in the RFID column to the left of the Name column for the user of this chip.
- After saving the RFID number and updating the RFID login page, hold the chip in front of the RFID reader. The time tracking page opens (as shown above in the mobile phone image), and the user can enter times.
Time recording with QR code:
- To use the QR code feature, you must first create the QR code. You can do this yourself in the employee settings. Select the employee row and click the QR icon in the first column (QR title). A QR card will appear on the screen.
- After printing, you can use this card with the sanoplan QR Reader (it does not work with standard QR readers for security reasons).
- If you want to print all QR cards at once and not just one, do not click in the name bar, but on the printer icon at the top.
- After printing the QR code, please open https://www.sanoplan.com/sanoplan/qr_scanner.html on a PC, tablet, or mobile phone with internet access. You will then be asked to grant access to the camera.
- Hold the card so that the QR code is in the square on the screen. This should open the time tracking/roster page (as in #2c), allowing you to start or stop tracking.
- Prevent users from entering data: If the controller wants to grant users access to their data but prohibit them from entering and editing data, they can do so by deactivating the “User time editing” option in the blue area at the bottom of the settings page.