Further Trainings:
Basic training
Welcome!
This basic training will guide you through the software step by step.
1. Get help!
Email support:
Click the envelope icon in the top right corner to submit a support request or suggest improvements. You don’t need to open a separate email program.
Help icons:
Look for question marks (?) on various pages. Click them to see helpful instructions for that page.
Tooltips:
Hover over buttons (e.g., funnel, red minus, or printer icon) without clicking. A brief explanation of the button’s function will appear.
2. Add new employee:
Click the gear icon (⚙️) in the top right corner to open the settings.
- Go to the “Employees” section.
- Enter the following information:
- Name: Enter a unique name (e.g. Adam or Eve).
- Days per week: Number of working days (e.g. 5).
- Weekly hours: Number of working hours (e.g., 38.5). (Numbers only – no text.)
- (Optional) Vacation days, start date and end date according to contract.
- Click on the green [+] to save the employee.
Note :
When a user’s contract ends, they will be removed from the active list but will remain in the system for three years. You can view previous users by clicking the funnel icon and adjusting the filters.
To correct an error:
Double-click the cell you want to correct, edit it, and press Enter to save.
3. To create a new shift:
Click on “Shift” in the blue menu on the left.
- For example, enter the following data in the empty input fields above:
- Name: test66 as shift name
- Start time: 10:00
- Duration: 7:00 hours
- Leave other fields (group, number) blank
- Click the green [+] to save the shift.
- Create a free text row (for information to colleagues or similar)
- Add another row with the following information:
- Name: Free text
- Start type: zzz (or any text)
- No.: 1
- Check the ‘Free text’ checkbox.
- Leave the rest blank.
- Save the row with the green [+] button.
Note :
The free text row is used for writing short notes (e.g., “Meeting” or “Special Instructions”).
To write a note, click in the field for the desired day of the week and start typing. The note will be saved automatically.
4. How to use the roster:
After you have closed the settings ([x] button in the top right corner), you will return to the main view of the roster.
You now see:
- Your newly added employees (e.g. Adam and Eve).
- The shifts you created.
To assign a shift:
- Drag and drop an employee’s name onto today’s shift (today is marked with a green dot).
How to report an absence (e.g. sick leave):
- Drag the employee’s name down to the “Absence” row (highlighted in blue).
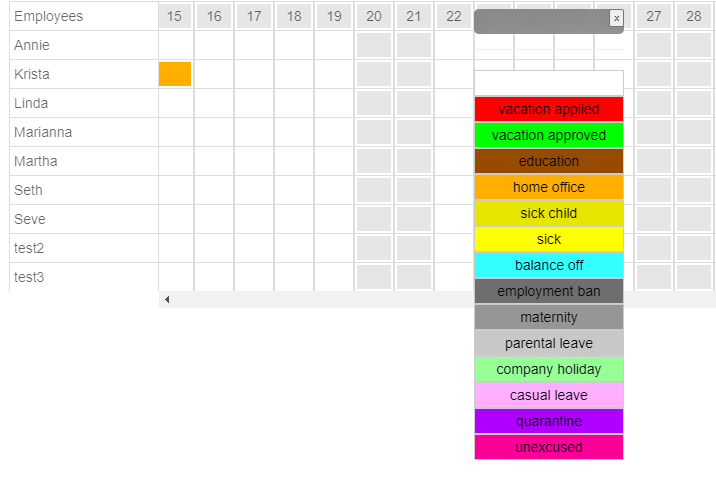
5. Manage absences in the vacation planner:
Click on the airplane symbol ✈️ in the top center to open the vacation planner.
Find the correct date by scrolling horizontally with the mouse or using the scroll bar.
To change the absence type:
- Click on the yellow cell.
- A drop-down menu will appear. Select a new absence type (e.g., turquoise for “Overtime Withdrawal”).
To set an absence for multiple days:
- Click on the colored cell.
- Hold down the mouse button and drag the mouse pointer over the next few days.
- Release the mouse button – the new absence type will be applied to all selected days.
- If you want to extend an absence such as illness, it works the same way
- If you want to shorten an absence, click in the next white field to the right or left of the absence field. Then drag the white area into the color-highlighted absence up to the day you want to delete.
Back to the roster:
- Click “Exit” in the top right corner to return. The marked absence days will now also be displayed in the blue-highlighted absence area at the bottom of the schedule.
6. Important to know!
If you are logged out of the system (after 5–10 minutes of inactivity), simply log in again using your password.
(The default password is “admin” until you change it.)
That’s it! You’re ready to start.